What Is Best Way to Store Oil Pastels So They Do Not Melt Together?
Oil pastels feel rich, smooth, and fun to use. That same soft texture can also create a messy problem. If the room gets hot, the sticks can turn tacky, pick up dust, lose their shape, and press into each other. Then you open the box and find a colorful lump instead of clean pastel sticks.
The good news is that you do not need a fancy studio setup to fix this. You need a cool space, smart separation, and a storage system that keeps each stick from rubbing against the next one.
In this guide, you will learn simple, practical steps that help oil pastels stay clean, usable, and easy to sort. You will also see which storage methods work best, which ones fail in hot weather, and how to rescue sticky pastels before they turn into one big mess.
In a Nutshell
- The best storage method is simple. Keep oil pastels in a cool, stable room and place them in a shallow divided box so each stick has its own space. This setup lowers pressure, cuts down friction, and helps stop soft sticks from touching long enough to fuse together. If a stick is extra soft, wrap it loosely in paper or keep it in its sleeve.
- Heat is the real enemy. Oil pastels contain wax, oil, and pigment. That mix stays workable, which artists love, but it also softens in warm spaces. A sunny shelf, a hot car, a windowsill, or the top of a radiator can ruin a set much faster than most people expect. Even if the pastels do not fully melt, they can still grow sticky and smear into nearby colors.
- Separation matters as much as temperature. If you toss loose sticks into one tin or one deep box, they rub together every time you move the container. That rubbing spreads color, flattens corners, and causes sticking. A divided tray, paper sleeve, or sheet of glassine gives each stick a small safety zone.
- Flat and shallow storage works better than deep piles. Heavy layers press soft pastels into each other. A shallow drawer or low organizer keeps pressure low. That makes it easier to see colors, grab the one you want, and put it back without crushing the others. Easy access also means you are less likely to create damage while searching.
- Cold storage is not the first answer. A fridge can help in very hot weather, but it should be a short term fix, not your daily plan. Sudden moisture from condensation can create new problems if you take the box out too fast. Use this method with care, and only if your home regularly gets too warm.
- A quick check saves a whole set. Look at your pastels every few weeks in summer. If the wrappers look oily, the edges look shiny, or colors start to transfer, act early. Clean them, separate them, and move them to a cooler spot. Small fixes done early are far easier than dealing with a sticky pile later.
Why Oil Pastels Melt Together So Easily
Oil pastels are soft because they are made from pigment mixed with wax and oil. That is why they glide across paper and blend so well. It is also why they react badly to heat and pressure. In a warm room, the surface can soften before the whole stick looks melted.
Once the outside becomes tacky, one pastel can cling to another. Then dust sticks to both. Then wrappers tear. Then colors smear. The problem grows fast.
This is why many artists confuse two different issues. One is full melting. The other is surface softening. Surface softening happens first, and it is enough to make a set messy.
The main triggers are heat, direct sunlight, crowded storage, and stacked weight. If you solve those four issues, you solve most of the problem.
Pros: Understanding the cause helps you prevent damage early.
Cons: If you ignore the early signs, cleanup takes time and can waste pigment.
Aim for a Cool and Stable Room
The safest home for oil pastels is a room with a steady, moderate temperature. A cool cupboard, a shaded shelf, or a drawer inside the main living space usually works well. Try to avoid rooms that swing from cool to hot during the day.
A stable range matters more than a perfect number. Still, a room around 15 to 25 C is a smart target. Large swings in temperature can stress art materials, and higher heat can soften wax based media.
Do not store oil pastels in an attic, garage, garden shed, or car. Those spaces can heat up fast, even if the outdoor weather feels mild. A closet inside the house is usually safer than a studio corner near a bright window.
Pros: This method is cheap, easy, and good for daily use.
Cons: It may not be enough in a very hot climate without extra protection.
Keep Them Away From Sun and Heat Spots
Sunlight does more than brighten a room. It heats the surface it hits. A box of oil pastels can sit in a room that feels normal, but direct sun on the lid can warm the sticks much more than the air around them.
Keep pastels away from windows, radiators, fireplaces, heaters, lamps, and electronics that throw off steady heat. Do not place them on top of shelves near the ceiling in summer, because warm air rises. A lower drawer often stays cooler.
Also think about daily habits. If you sketch near a sunny window, do not leave the open tray there after you finish. Put it away right after use. Fast put away habits stop slow heat damage.
A simple rule helps. If a spot feels warm to your hand, it is too warm for long storage.
Pros: This fix costs nothing and works right away.
Cons: You need to stay consistent, especially in bright rooms.
Use the Original Tray if You Have a Small Set
If your set is still small and the original tray is in good shape, keep using it. Most original trays separate colors well and stop rolling. That alone reduces sticking. Cardboard boxes with fitted inserts can work better than people think if you store them in a cool place.
This method is best for beginners or anyone who owns one set and uses it at home. The key is to return each stick to its slot after every session. If wrappers are loose, tighten or replace them so oil does not spread onto the tray.
Once sticks get shorter or break into pieces, the original insert becomes less useful. Small pieces slip out of place and start touching other colors.
Pros: It is simple, free, and keeps the set organized by color family.
Cons: It works poorly once sticks become uneven, broken, or mixed from several sets.
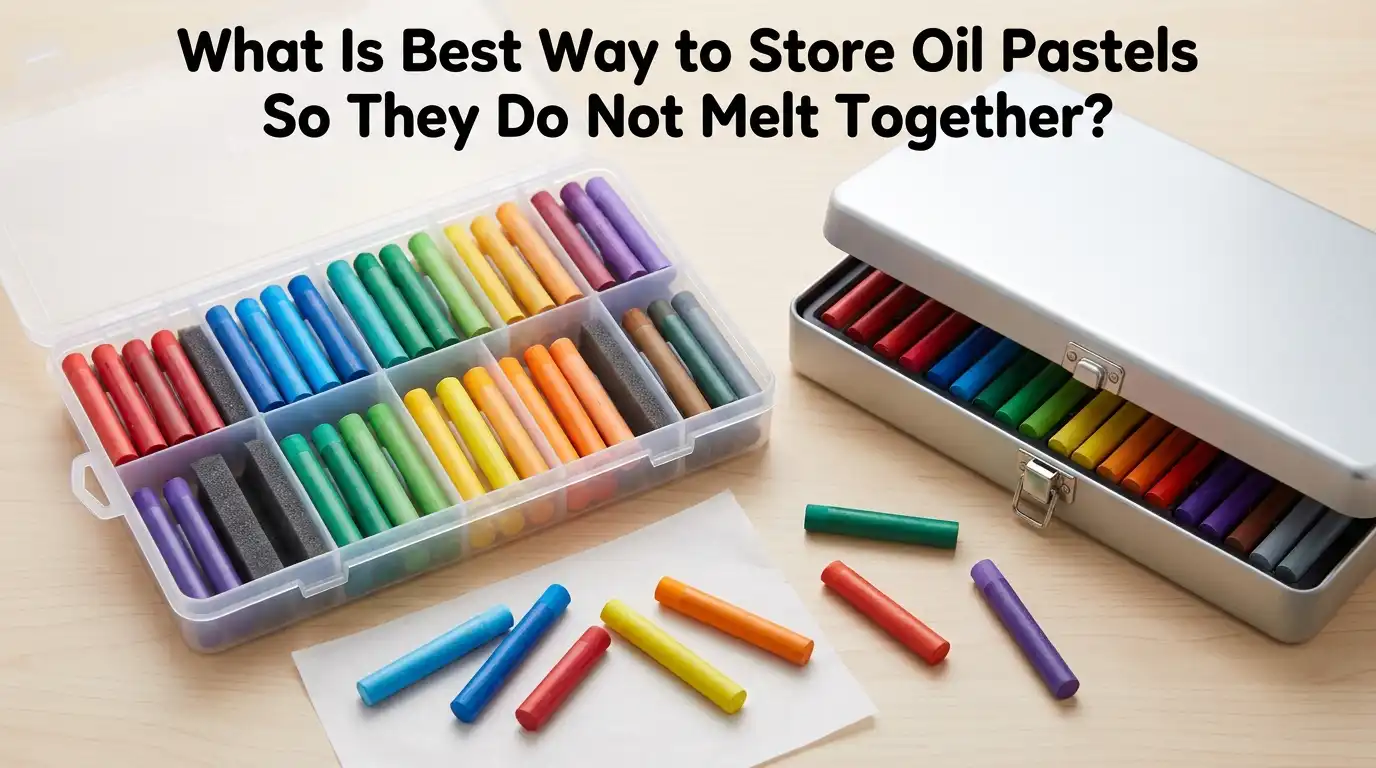
Move Loose Sticks Into a Shallow Divided Box
For most people, this is the best long term answer. A shallow box with compartments gives each pastel its own space. That stops rubbing, makes colors easy to find, and keeps weight low. It also works better than one deep tin filled with loose sticks.
Choose a box that stays flat and does not let sticks roll around. Small sections are better than one open area. If your collection grows, use more than one shallow tray instead of stacking pastels in thick layers.
Sort the colors in a way that makes sense to you. You can group them by hue, value, or favorite use. The exact order matters less than keeping them separated and easy to return.
Pros: Great for medium and large collections, easy to maintain, and easy to see at a glance.
Cons: Needs a bit of setup time and takes more shelf space than one crowded box.
Wrap Very Soft Sticks and Broken Pieces
Some oil pastels are softer than others. Some older sticks also lose firmness over time. If a pastel feels extra creamy, do not let it sit bare against the next stick. Give it a light paper wrap or keep part of the original wrapper on the body.
Broken pieces need extra care because they have more exposed surface area. More surface means more sticky contact. You can place those pieces in tiny paper sleeves or small sections of folded glassine. Keep the wrap loose enough that you can still slide the pastel out without damage.
This step is especially helpful for white, black, and skin tone sticks because they get used often and become stubby fast.
Pros: Strong protection for soft brands and small pieces.
Cons: It adds a little handling time every time you paint.
Add a Barrier With Glassine or Parchment
If your storage box has wide sections, add a second layer of protection. Glassine works well because it is smooth, light, and commonly used to protect art surfaces. A small strip between sticks can stop tacky surfaces from touching directly.
Parchment paper can help in a pinch for short home storage, but glassine is the better choice for art use. Do not use tissue that sheds fibers, and do not use rough paper that can grip the pastel and leave dust.
This method is also useful if you store pastels in a travel case. A thin sheet over the top can reduce transfer during movement. Just make sure the sheet lies flat and does not bunch up.
Pros: Cheap, light, and very good for extra separation.
Cons: Loose sheets can slide around if the box is moved too much.
Store Them Flat or in Very Low Layers
Pressure causes trouble. If you stack oil pastels in deep layers, the weight from the top presses into the sticks below. In warm weather, that pressure can flatten edges and make colors bond together.
Flat storage avoids that problem. A drawer, tray, or shallow organizer keeps each stick visible and lowers contact. If you must layer them, keep the layers very low and add a smooth divider between them. One thin layer is safest. Two low layers can work if the box stays cool and still.
Vertical storage is fine for finished pastel art, but loose oil pastel sticks usually do better in flat trays. The goal is simple. Reduce rolling. Reduce rubbing. Reduce weight.
Pros: Protects shape, keeps colors clean, and makes selection easier.
Cons: Needs more horizontal room than a tall storage bin.
Use the Fridge Only as a Short Term Rescue Plan
A fridge can help in extreme heat, but it is not the first method to choose. If your home becomes very warm for a few days, you can place oil pastels in a sealed container and cool them gently. This can firm up sticky sticks and stop further softening.
The sealed container matters. It helps reduce moisture from condensation. After removal, let the box warm up slowly before opening it. If you open it too fast, damp air can settle on the pastels and wrappers.
Do not put oil pastels in a freezer. Very cold storage can make some materials brittle, and sudden changes are hard on art supplies.
Pros: Helpful during heat waves and good for short term rescue.
Cons: Moisture risk, extra care needed, and not ideal for daily storage.
Clean and Sort Sticky Pastels Before You Put Them Away
If your pastels already feel sticky, do not drop them straight back into the box. Clean them first. Wipe loose color from the wrapper and gently scrape or rub off the worst transfer on the stick surface. Use a light hand. You want to remove mess, not waste usable pastel.
After cleaning, sort soft sticks away from firmer ones. Put frequently used short pieces in their own section so they do not get buried under full sticks. If a wrapper is soaked with oil or badly torn, replace it with a simple paper wrap.
This small cleanup routine prevents one messy stick from dirtying the whole set. It also helps you spot which colors soften first in your room.
Pros: Keeps the set usable and extends the life of each stick.
Cons: Takes a few extra minutes after each art session.
Build a Simple Travel Plan for Hot Days
Travel is hard on oil pastels because movement and heat often happen together. A box can sit in a warm car, then get shaken in a bag, then pressed under other supplies. That is the perfect setup for sticking and breakage.
Use a small hard case with shallow sections. Add a smooth sheet over the top so sticks do not jump between sections. Keep the case in a bag that stays out of direct sun. If you travel by car, bring the pastels indoors with you. Do not leave them parked inside the vehicle.
For very hot days, carry fewer colors. A compact set creates less weight and less rubbing. Less movement and less heat give you a much better result than any fancy case alone.
Pros: Protects your set during classes, trips, and outdoor sketching.
Cons: Needs planning, and heat can still win if the case is left in the car.
Check Your Storage Every Few Weeks
Oil pastel storage is not a one time job. Rooms change with the seasons. Summer sun shifts. A shelf that felt cool in spring may feel warm in July. A quick check every few weeks helps you catch problems before they spread.
Open the box and look for shiny surfaces, oily wrappers, loose paper dust, color transfer, or sticks that feel softer than usual. Touch the storage area too. If the drawer or shelf feels warm, move the set. If one color keeps getting messy, wrap it better or give it its own section.
This habit only takes a minute or two. It can save a full set from turning into a stained block of color.
Pros: Early action prevents bigger damage and wasted cleanup time.
Cons: You have to remember to do it during warm months.
The Best Storage Setup for Most Artists
If you want one clear answer, here it is. The best way to store oil pastels is to keep them in a cool indoor space inside a shallow divided box with each stick separated by its own compartment, wrapper, or smooth paper barrier.
This method works because it solves the three main causes of trouble. It lowers heat exposure. It reduces contact. It removes heavy pressure from stacked layers. It also makes your colors easier to find, which means less digging and less accidental damage.
For small sets, the original tray can still work well. For large sets, shallow drawers or divided organizers are better. For heat waves, a sealed container in the fridge can help for a short time. But for normal daily storage, cool, flat, separated, and shaded is the winning plan.
Pros: Balanced, practical, low cost, and easy to keep up.
Cons: It takes a little setup at first, but the payoff is worth it.
FAQs
Can oil pastels really melt in normal home heat?
Yes, they can soften enough to stick even before they fully melt. That is the issue most people notice first. A room can feel fine to you, but direct sun, a hot shelf, or trapped heat inside a box can make the pastel surface tacky. Once that happens, colors transfer fast.
Is it okay to store oil pastels in plastic boxes?
Yes, plastic boxes can work well if they are shallow, divided, and kept in a cool place. The problem is not the plastic itself. The real problem is overcrowding, trapped heat, and deep stacking. If the box has compartments and stays away from sun, it can be a solid choice.
Should I wrap every single oil pastel?
No, not always. Full wrapping is most useful for very soft sticks, broken pieces, or travel sets. If each pastel already has its own compartment, you may only need wrappers on the softest or shortest ones. The goal is separation, not extra fuss.
What should I do if my oil pastels already stuck together?
Cool them first, then separate them slowly. Clean off loose transfer, replace damaged wrappers, and move the sticks into a better system right away. Do not force soft pastels apart in a hot room. That can waste pigment and break the sticks. A calm cleanup now can save most of the set.

Hi, I’m Zoe Ward, the creator and voice behind Fine Brush Vault. I’m passionate about art, painting, and exploring the world of colors. I spend my time testing and reviewing art supplies to help fellow creators find the best tools for their craft. Through honest reviews and detailed guides, my goal is to make your creative journey easier and more inspiring.