How to Safely Remove a Dried Painting From a Watercolor Block Without Tearing?
You finished a beautiful watercolor painting on your block. The colors look perfect. The paper dried flat. Now comes the scary part.
You need to peel that finished sheet off the glued block without ripping it. Many artists have lost stunning paintings at this very stage. One wrong move can leave a crease, a tear, or a chunk of glue stuck to the back.
The good news is that removing a sheet from a watercolor block is simple once you know the right method. The block is designed for easy release. You just need patience, the correct tool, and a steady hand.
In a Nutshell:
- Wait for full dryness. Your painting must be completely dry before removal. Moist paper tears easily and stretches under pressure. Give it at least 24 hours after your final wash.
- Find the gap first. Every watercolor block has a small unglued opening on one side. Look for the notch or label that points to it. Starting at the wrong edge causes most tears.
- Use a dull flat tool. A palette knife, butter knife, or bone folder works best. Sharp blades slice fibers and ruin the edge. Credit cards work in a pinch.
- Slide, do not pry. Move your tool parallel to the paper, gliding along the glue line. Lifting upward bends the sheet and creates creases.
- Work slowly around all four sides. Travel around the block in one smooth motion. Rushing breaks the glue seal in jagged spots and damages the paper edge.
- Save tearing repairs for later. If something rips, do not panic. Archival tape and gentle flattening can rescue most accidents.
What Is a Watercolor Block and Why Does It Stick
A watercolor block is a stack of paper sheets glued together on all four edges. The glue holds the paper flat while you paint. This stops the paper from buckling when wet. Most brands like Arches, Strathmore, Saunders Waterford, and Fabriano make blocks in different sizes and weights.
The glue is usually a soft gum binder. It is strong enough to keep the sheet steady. It is also weak enough to break with gentle pressure. The trick is knowing where to apply that pressure. Each block has a small gap on one edge where no glue sits. This gap is your starting point.
Blocks save time because you skip the stretching step. You also get a flat finished painting once you remove it. The downside is the removal process. Many beginners do not realize the gap exists. They try to lift from the wrong side and damage their work.
Why Tearing Happens in the First Place
Tearing happens for a few clear reasons. Knowing them helps you avoid them. The most common cause is pulling the paper upward. When you lift instead of slide, the fibers separate from the glue unevenly. This creates ragged tears along the edge.
The second cause is starting at the wrong side. If you push your knife into a fully glued edge, the blade has nowhere to go. It pushes into the paper instead of along it. This punctures the sheet and ruins the corner.
A third cause is moisture trapped inside the block. If your painting is still slightly damp, the glue softens unevenly. The paper stretches under your tool and rips. Heavy washes can keep the underside damp for over a day.
The last cause is using sharp tools. Razor blades, X-Acto knives, and pointed scissors slice paper fibers cleanly. They look precise but cut through the sheet itself instead of separating glue. Always pick a dull, flat tool.
Step One: Let the Painting Dry Completely
Patience is the first rule. Your painting needs to be bone dry before removal. Touch the surface with the back of your hand. If it feels cool, moisture is still present. Cool means damp. Wait longer.
A good rule is to wait at least 24 hours after your last wash. Heavy paintings with thick layers may need 48 hours. You can also check the back edge of the block. If the paper looks darker than the rest, water is still trapped.
Do not use a hairdryer to speed things up. Heat can warp the fibers and weaken the glue in random spots. This causes uneven release later. Air drying at room temperature is the safest option.
If you live in a humid area, place the block near a fan. Keep airflow gentle. Avoid direct sunlight because UV light fades fresh pigments. Once the paper feels warm and crisp, you are ready for the next step.
Step Two: Find the Unglued Opening
Every watercolor block has a small gap on one side. This is the starting point for removal. Look closely at all four edges. You will see a tiny notch, an arrow, or a label that says open here. Some brands print a small line where the gap begins.
Run your finger along each side. The glued edges feel firm and smooth. The open side feels slightly loose. You may even see the layers of paper sheets separated like a fanned book. This is the gap you want.
Pros of finding the gap first: You avoid 90 percent of tearing accidents. You also reduce the time needed for removal. The whole process takes under two minutes once you start in the right spot.
Cons of skipping this step: You will likely puncture the paper. You may also bend the corner. Some artists in a hurry damage three or four sheets before realizing the mistake. Always locate the gap before you pick up any tool.
Step Three: Choose the Right Removal Tool
The tool you pick matters more than you think. The best choice is a palette knife with a thin flexible blade. The thin edge slides under the sheet smoothly. The flexibility lets you follow the curve of the glue line.
A butter knife is the second best option. It has a dull edge and a sturdy body. It works on most blocks but can feel a bit thick on smaller pads. A bone folder, used by bookbinders, is also excellent. It gives a smooth glide and never cuts paper.
Pros of a palette knife: Thin, flexible, and clean. It fits into tight gaps and rarely damages the paper. Most artists already own one.
Cons of a palette knife: Some have sharp tips that need extra care at corners. Cheap ones may bend permanently.
Pros of a butter knife: Easy to find. Strong and dull.
Cons of a butter knife: Slightly thick for very tight gaps. Serrated edges can snag fibers if not careful.
Avoid scissors, razors, and craft knives. They slice rather than separate.
Step Four: Slide the Tool Into the Opening
Hold the block flat on a table. Place one hand on top to keep it steady. With your other hand, slide the flat side of your tool into the gap. Keep the blade parallel to the paper, not pointing down.
Push gently. The blade should glide between the top sheet and the second sheet. If you feel resistance, stop. Pull back and try a slightly different angle. Forcing the tool causes punctures.
Once the blade is fully in, move it sideways toward the nearest corner. Work slowly. The glue should release with a soft cracking sound. This sound is normal. It means the bond is breaking cleanly.
If the blade stops moving, the glue is thicker in that spot. Do not push harder. Pull the blade back, reinsert, and try again at a different depth. Every block has small uneven glue patches. Patience handles them best.
Step Five: Work Around All Four Edges
After the first edge releases, rotate the block. Move to the next side. Repeat the same sliding motion. Always go in the same direction around the block, like circling a clock.
Take your time on the corners. Corners hold the most glue. Slide the blade in from both connecting sides if needed. Never cut across the corner with a sharp tool. This shaves off the paper edge and looks messy.
Pros of the four edge method: Clean release on all sides. Your finished painting keeps its full deckle edge if the brand provides one.
Cons of the four edge method: Takes a few minutes longer than rushing. Some artists feel impatient. The trade off is a perfect sheet every time.
By the time you finish the fourth edge, the top sheet should lift away freely. Do not pull until all four sides are released. Pulling early is the most common cause of tearing in the final second.
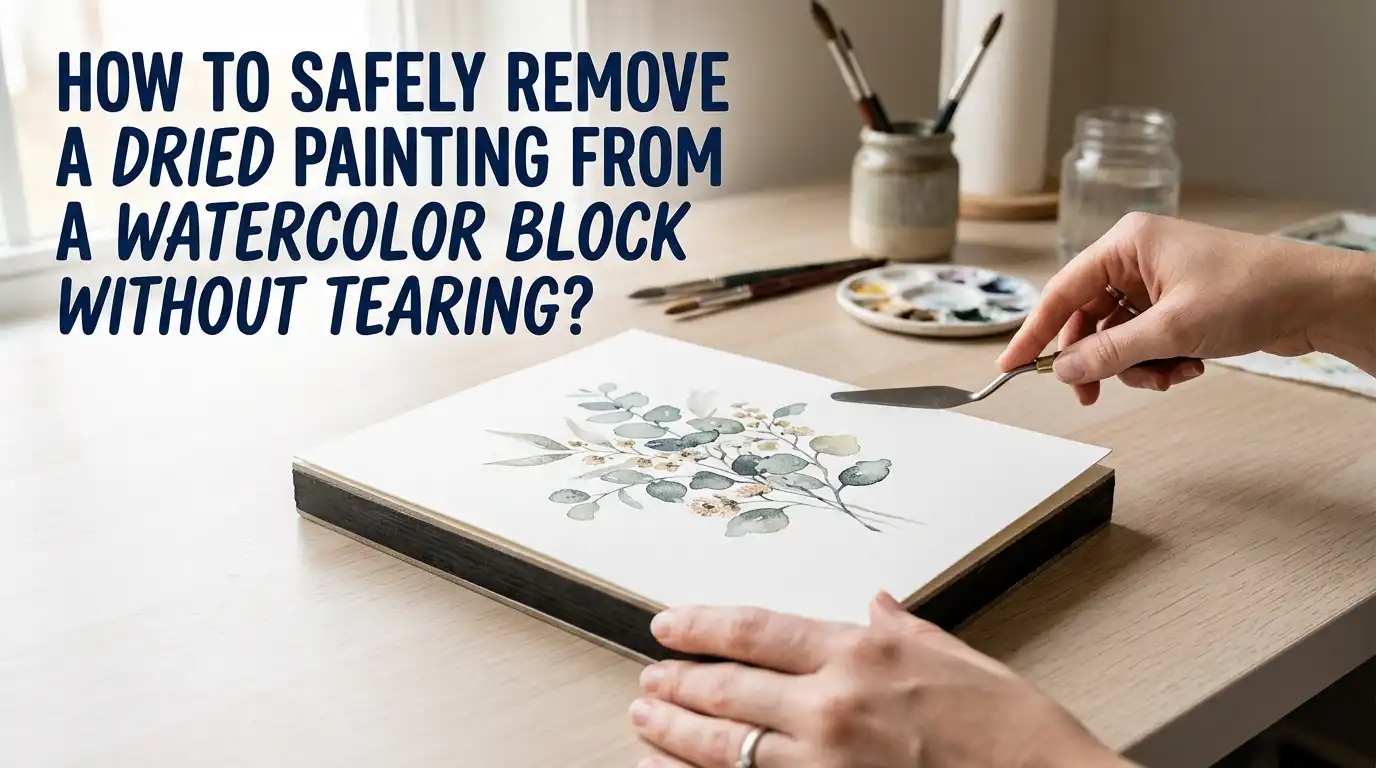
Step Six: Lift the Sheet Gently
Once all edges are free, lift the sheet by two opposite corners. Use both hands. Raise it slowly and evenly. The paper should peel off without resistance. If you feel any tug, stop and check for missed glue spots.
Place the sheet on a clean flat surface. Avoid surfaces with crumbs, water drops, or rough textures. A clean cutting mat or smooth desk works perfectly.
If you see small bits of dried glue stuck to the back of your painting, leave them alone. They will not affect framing. Trying to scrape them off can dent the paper. Most framers cover the back anyway.
Pros of slow lifting: Keeps the painting flat and undamaged. Saves any deckle edges.
Cons of slow lifting: Requires both hands free. You may need to set down your phone or coffee first. A small price for a safe finish.
What to Do If Your Paper Starts to Tear
Sometimes things go wrong. A small tear starts in the middle of removal. Stay calm. Stop pulling immediately. Pulling more makes the tear worse.
Slide your tool back into the spot where the glue is still holding. Release the rest of the edge gently. Once the sheet is fully free, examine the tear. Most tears happen near the edges and fall outside the painted area.
For small edge tears, trim the damaged strip with a sharp craft knife and a ruler. This gives a clean straight edge. You lose a few millimeters but save the artwork.
For tears inside the painting, use acid free archival tape on the back. Apply it flat and press gently. The tape holds the fibers together without yellowing over time. You can also use Japanese mending tissue with wheat starch paste for a museum quality fix.
Do not use regular cellophane tape or masking tape. They yellow, dry out, and damage paper over the years.
Alternative Methods for Stubborn Blocks
Some blocks have extra strong glue. Older pads, humid storage, or budget brands can all cause tough release. If your standard method fails, try these alternatives.
The credit card method uses an old plastic card. The flexible plastic bends around the corners. It is duller than a knife and very safe. Slide it in flat and rock it side to side along the glue.
The thread method works for very thin paper. Take a length of strong thread or dental floss. Loop it around the gap. Pull both ends across the glued edge in a sawing motion. The thread cuts the glue without touching the paper face.
Pros of the credit card method: Extremely gentle. No sharp edges. Cheap and easy.
Cons: Slow on thick blocks. Plastic can bend permanently.
Pros of the thread method: Works on tight glue. Reaches inner edges easily.
Cons: Tricky on thick paper. Can snap if pulled too hard. Needs practice.
Storing Your Removed Painting Safely
Once your painting is off the block, store it properly. Lay it flat between two clean sheets of acid free paper. Avoid rolling or folding watercolor paper. Folds leave permanent creases.
Keep the painting away from direct sunlight. Sunlight fades watercolor pigments quickly, especially staining colors like alizarin and sap green. A flat folder or portfolio case works well.
For long term storage, use a cool dry place with stable humidity. Basements and attics are bad choices. They get damp or hot. A drawer in a living room is much safer.
If your painting curled slightly during removal, flatten it. Place it face down on a clean towel. Lay another clean towel on top. Press flat with heavy books for 24 hours. The paper relaxes back into shape.
Tip: Sign and date the painting before removal if you can. Working on the block gives a steadier surface for fine signature lines.
Common Mistakes to Avoid
Many tearing problems come from a few repeated mistakes. The first is removing the sheet while still wet. Always wait for full dryness.
The second is using the wrong tool. Sharp blades slice paper. Thick tools push instead of glide. Stick with thin, dull, flat options.
The third is starting at a glued edge instead of the gap. Always find the opening first. Look for arrows, notches, or labels.
The fourth is lifting upward instead of sliding sideways. Keep the blade parallel to the paper at all times.
The fifth is rushing the corners. Corners hold extra glue. Slow down at every turn. Treat each corner as its own small task.
The last mistake is pulling too early. Wait until all four sides are fully released. Even one stuck spot can create a tear during the final lift. Patience saves paintings.
FAQs
How long should I wait before removing a sheet from a watercolor block?
Wait at least 24 hours after your final wash. For heavy paintings with thick paint layers, wait 48 hours. The paper must feel completely dry and crisp. Damp paper tears easily under any tool. If the back of the block looks darker than the front edges, moisture is still inside.
Can I use a regular knife from my kitchen?
Yes, a butter knife works well. Choose one with a dull, flat, smooth edge. Avoid serrated knives because the teeth can snag paper fibers. Sharp paring knives slice through the sheet instead of separating glue. Stainless steel butter knives are sturdy and gentle on paper.
What if my watercolor block has glue on all four sides with no gap?
Look very closely along each edge. The gap is sometimes only one inch wide. Some brands hide it under the cover label. If you truly cannot find it, slide a thin palette knife into any corner at a flat angle and work outward. Move slowly to avoid puncturing the sheet.
Is it safe to remove a sheet before finishing the painting?
Generally no. The block holds paper flat during wet washes. Removing it early causes buckling. If you must remove it, tape the sheet to a board with painter’s tape and let it dry flat between sessions. This mimics the block’s flat support.
Why does my paper still buckle on the block after drying?
This usually means the paper weight is too low for the amount of water used. Heavier paper like 300 gsm or 640 gsm buckles less. Excessive water pooling can also overwhelm even thick paper. Use slightly less water in your washes or switch to a higher weight block.
Can I reuse the cardboard backing of an empty watercolor block?
Yes. The backing makes a great drawing board or paper support. You can tape loose watercolor sheets to it for travel or outdoor painting. It is sturdy, lightweight, and already sized for your favorite paper format.

Hi, I’m Zoe Ward, the creator and voice behind Fine Brush Vault. I’m passionate about art, painting, and exploring the world of colors. I spend my time testing and reviewing art supplies to help fellow creators find the best tools for their craft. Through honest reviews and detailed guides, my goal is to make your creative journey easier and more inspiring.