How to Get Eraser Out of Mechanical Pencil? Easy Step by Step
We have all been there. You flip your mechanical pencil over to erase a mistake, and the eraser is either too short to grab or completely stuck inside the cap. It feels like such a small problem, but it can stop your workflow and leave you frustrated in the middle of an exam, a sketch, or a quick note.
The good news? You do not need any special skills or expensive tools to fix this. A few household items like a paperclip, a pin, or a pair of tweezers can solve the problem in seconds. This guide walks you through every method, explains why erasers get stuck in the first place, and shares tips to prevent it from happening again.
Whether your eraser has worn down to a tiny nub, hardened over time, or simply wedged itself too deep inside the barrel, you will find a solution here. Stick around, because some of these tricks are so simple you will wish you knew them sooner.
In a Nutshell
- A bent paperclip is the most popular and effective tool for pulling a stuck eraser out of a mechanical pencil. Bend the tip into a small hook, pierce the eraser, and pull it straight out. This method works on nearly every brand and pencil style.
- Tweezers and needle nose pliers work well if even a small portion of the eraser is still visible above the cap. Grip the exposed rubber firmly, wiggle gently, and slide it out without damaging the pencil barrel.
- A straight pin or dental pick can pierce a hardened eraser that sits too deep for tweezers to reach. Push the sharp point into the center of the eraser, angle it slightly, and lift the eraser free from the holder.
- Compressed air or tapping the pencil against a surface can loosen an eraser that is stuck due to dust, debris, or dried residue. Hold the pencil upside down and give a few firm taps on a hard surface to dislodge it.
- Rubbing alcohol or a tiny drop of acetone can dissolve the sticky residue that sometimes bonds an old eraser to the inside of a metal or plastic holder. Apply sparingly and let it sit for a minute before attempting removal.
- Regular maintenance prevents future problems. Replace erasers before they wear down to a flat nub, store pencils in a cool and dry place, and occasionally remove the eraser cap to check for buildup or debris.
Why Do Mechanical Pencil Erasers Get Stuck
Mechanical pencil erasers get stuck for a few common reasons. The most frequent cause is wear and tear. As you erase, the rubber wears down and becomes flush with or sinks below the metal or plastic holder. This makes it nearly impossible to grip with your fingers.
Another reason is heat and age. Old erasers can harden and shrink, creating a tight bond with the inner wall of the eraser sleeve. Humidity and temperature changes also play a role. Rubber can swell slightly in warm conditions and then contract as it cools, locking itself in place.
Debris and graphite dust can build up inside the eraser holder over time. This gritty residue acts like glue between the eraser and the housing. Pencils stored for long periods without use are especially prone to this issue.
Tools You Will Need Before You Start
Gathering the right tools before you begin saves time and protects your pencil from damage. The good news is that most of these items are already in your home or office.
A standard metal paperclip is the single most useful tool. You can bend it into a hook or a straight pick in seconds. Fine point tweezers are another excellent option, especially the slanted tip kind found in most grooming kits.
A sewing needle, safety pin, or dental pick works great for erasers that sit deep inside the barrel. If you suspect sticky residue, keep a small bottle of rubbing alcohol or a cotton swab nearby. You may also want a soft cloth to wipe down the inside of the eraser sleeve after removal.
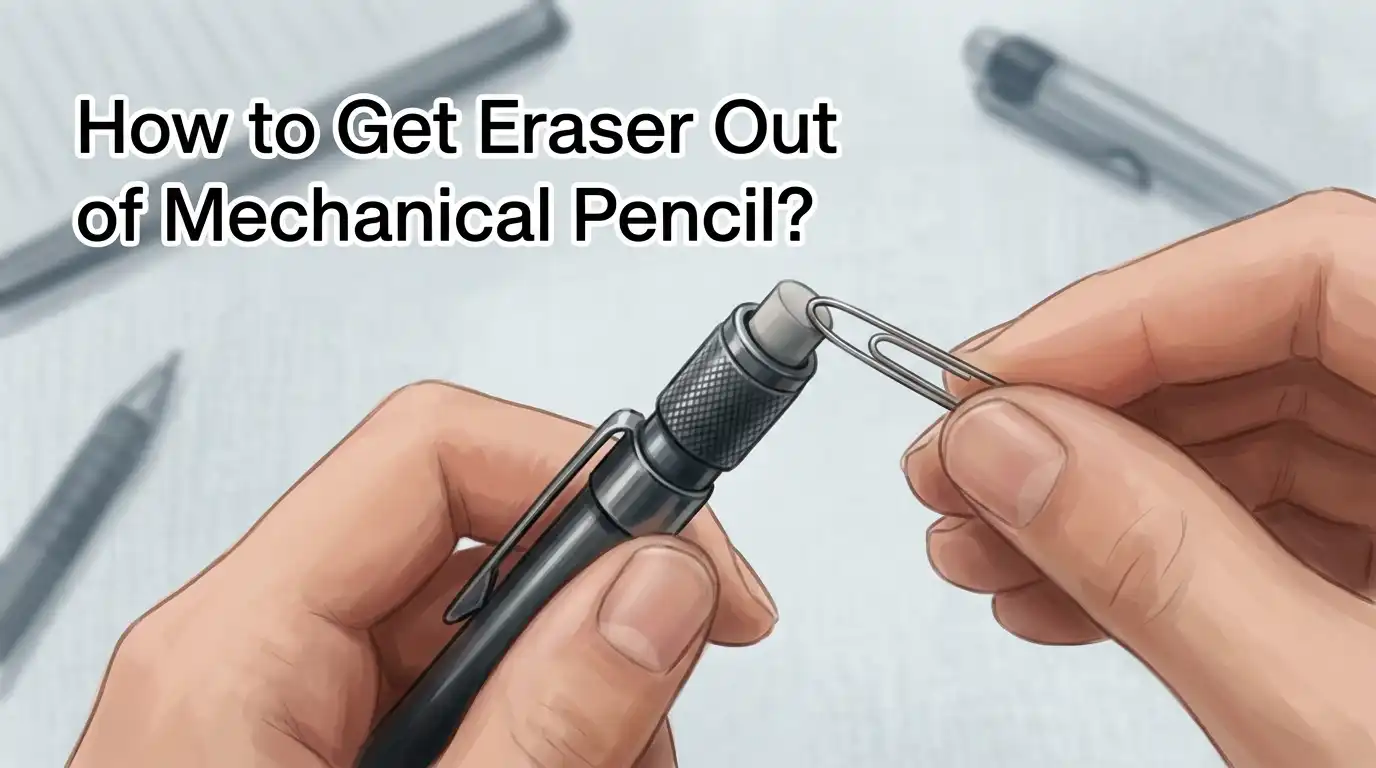
Method 1: The Paperclip Hook Technique
This is the most widely recommended method across pencil communities and forums. It is simple, fast, and works on almost every type of mechanical pencil.
Start by straightening out one end of a metal paperclip. Then use your fingers or small pliers to bend the very tip into a tiny hook shape. The hook should be small enough to fit inside the eraser holder opening.
Insert the hooked end into the eraser and push it firmly into the rubber. Once the hook catches, pull the paperclip straight up. The eraser should slide right out. If the eraser is very hard or old, twist the paperclip slightly as you push to get a better grip.
Pros: Free, easy, works on most pencils, and requires no special skills.
Cons: May tear very soft or crumbly erasers into pieces, and the hook can scratch the inside of cheap plastic holders if you are not careful.
Method 2: Using Tweezers or Needle Nose Pliers
If any part of the eraser is still visible above the holder, tweezers are your best friend. This method gives you a strong, controlled grip without needing to pierce the eraser at all.
Grab a pair of fine tip or slanted tweezers. Position the tips on opposite sides of the exposed eraser. Squeeze firmly and pull straight up with a steady motion. Avoid wiggling side to side too much, as this can break a worn eraser into smaller bits.
Needle nose pliers work the same way but provide even more gripping force. Use them gently to avoid crushing the eraser holder or cracking the pencil cap. This method is ideal for erasers that are slightly stuck but still partially accessible.
Pros: Clean removal with no piercing, great control, and fast.
Cons: Only works if part of the eraser is exposed; too much force can damage the pencil cap.
Method 3: The Pin or Needle Push Method
A straight pin, sewing needle, or thumbtack is perfect for erasers that have sunk completely below the rim of the holder. This technique uses the sharpness of the pin to anchor into the rubber and lift it out.
Hold the pencil steady with one hand. With the other hand, push the pin straight down into the center of the eraser. Drive it in at least a few millimeters so it holds firmly. Then pull the pin upward slowly.
If the eraser does not budge on the first try, push the pin in at a slight angle to get deeper into the rubber. You can also try inserting two pins side by side for extra leverage. A dental pick with a curved tip works well for this purpose too.
Pros: Reaches erasers that are deep inside the holder, very precise.
Cons: Risk of poking yourself, may leave a hole in a still usable eraser, and does not work well on very hard or brittle erasers.
Method 4: Tapping and Shaking the Pencil
Sometimes the simplest approach does the trick. If the eraser is loose but just sitting too low to grab, gravity and a few firm taps can free it.
Hold the pencil upside down so the eraser end faces the floor. Tap the pencil firmly against the edge of a desk or table. The impact should shake the eraser loose and cause it to drop out or rise enough for you to grab it.
You can also hold the pencil between your palms and roll it back and forth quickly. The vibration can break the friction holding the eraser in place. This works best on erasers that are not stuck due to residue or hardening but simply wedged in too tightly.
Pros: No tools needed, zero risk of damaging the pencil or eraser.
Cons: Only works on loosely stuck erasers; completely ineffective on hardened or bonded erasers.
Method 5: Using Compressed Air
Compressed air cans (the kind used for cleaning keyboards) can sometimes push an eraser out from behind. This method works if you can access the lead tube opening at the opposite end of the eraser chamber.
Remove the pencil tip and any lead inside. Point the compressed air nozzle into the lead tube opening and give a short burst of air. The air pressure can push the eraser upward and out of its holder.
Keep in mind this method does not work on all pencil designs. Some mechanical pencils have a sealed chamber between the lead tube and the eraser holder. Check your pencil’s design first before attempting this approach.
Pros: Hands free removal, no contact with the eraser at all.
Cons: Requires a can of compressed air, only works on certain pencil designs, and the eraser may shoot out unexpectedly.
Method 6: Applying Rubbing Alcohol or Acetone
When an eraser has bonded to the inside of its holder due to age, heat, or chemical reaction, a solvent can break that bond. Rubbing alcohol is the safest option for this.
Dip a cotton swab or the tip of a toothpick in rubbing alcohol. Apply a tiny amount around the edges of the stuck eraser, right where it meets the holder wall. Wait about 60 to 90 seconds for the alcohol to seep in and dissolve the residue.
Then use any of the previous methods (paperclip, pin, or tweezers) to pull the eraser free. If rubbing alcohol does not work, a small drop of acetone (nail polish remover) can be more effective. However, use acetone sparingly because it can damage certain plastics.
Pros: Breaks chemical bonds that physical force alone cannot, works on very old and stuck erasers.
Cons: Acetone may damage plastic pencil bodies, requires waiting time, and leaves a slight odor.
How to Remove the Eraser Cap Itself
On many mechanical pencils, the eraser sits inside a small removable cap or sleeve at the top of the pencil. This cap usually pulls straight off, but it can become stuck too.
Grip the cap firmly with your fingers and pull straight up. Do not twist, as some caps are friction fit and twisting can strip or crack them. If the cap will not budge, wrap a small rubber band around it for extra grip. The rubber band creates friction between your fingers and the smooth plastic or metal surface.
For metal caps that are stuck due to corrosion, a tiny drop of penetrating oil applied at the joint can help. Let it sit for a few minutes, then try pulling again. Always pull straight and steady to avoid bending the cap or breaking the pencil top.
Special Tips for Popular Pencil Brands
Different mechanical pencil brands use slightly different eraser housing designs. Knowing your pencil type helps you pick the right removal method.
Pentel Twist Erase pencils have a twist mechanism that extends the eraser. If the eraser is stuck, twist the top barrel fully to extend the eraser as far as possible. This should push the eraser high enough to grab with your fingers or tweezers.
Paper Mate mechanical pencils usually have a simple pull off cap with a cylindrical eraser underneath. These erasers are thin and wear down quickly. The paperclip hook method works best for these. Bic mechanical pencils have a similar design with a slightly tighter cap fit.
Cross and Rotring pencils often have precision machined eraser holders. Be extra careful with pins and hooks on these pencils to avoid scratching the interior metal surfaces.
How to Replace the Eraser After Removal
Once you get the old eraser out, replacing it is straightforward. Eraser refills are available at most office supply stores and come in standard sizes that fit popular pencil brands.
Measure the diameter of the eraser holder opening before you buy refills. Most mechanical pencils use erasers that are about 3 to 5 millimeters in diameter. Take the old eraser with you to the store for a visual size match if you are unsure.
To insert the new eraser, simply push it into the holder until it sits snugly. It should stick up just enough above the rim to be usable but not so high that it wobbles or falls out. If the refill eraser is too long, you can trim it with scissors or a craft knife.
How to Prevent Erasers from Getting Stuck Again
Prevention is easier than extraction. A few simple habits can keep your mechanical pencil erasers accessible and easy to swap.
Replace erasers before they wear down completely. Once an eraser gets flush with the holder rim, it becomes much harder to remove. Swap it out while there is still enough material to grip. This is the single most effective prevention tip.
Store your pencils in a cool, dry place. Heat causes rubber to soften and bond with surrounding materials. Cold causes rubber to harden and contract. Both extremes make removal harder. Room temperature storage is ideal.
Clean the eraser holder occasionally. Pull out the eraser every few weeks and wipe the inside of the sleeve with a dry cloth or cotton swab. This removes graphite dust and debris that can cause sticking over time.
When to Consider Replacing the Whole Pencil
There are times when the effort of removing a stuck eraser is not worth it. If the pencil is inexpensive and the eraser holder is cracked, warped, or corroded, a replacement pencil may be the smarter choice.
Signs that it is time to replace include a cracked or split eraser cap, a stripped threading mechanism on twist style pencils, or a holder that has been permanently deformed by plier use. Pencils with broken advance mechanisms or loose barrels are also better off replaced.
If you own a high quality or sentimental pencil, the effort is almost always worth it. A careful approach with the right tools will save the pencil without causing damage. Just take your time and avoid brute force methods that could crack the barrel or bend internal components.
Common Mistakes to Avoid During Removal
Rushing the process is the biggest mistake people make. Forcing a stuck eraser with too much pressure can crack the plastic cap, bend the metal sleeve, or break the pencil barrel. Always start with the gentlest method and work your way up.
Do not use a knife or box cutter to dig out an eraser. The blade can slip and cut your hand, and it will almost certainly scratch or gouge the inside of the holder. Sharp blades are dangerous and unnecessary for this task.
Avoid using excessive amounts of liquid solvents. A tiny drop of rubbing alcohol is enough. Pouring liquid into the pencil can seep into the lead advance mechanism and cause corrosion or jamming. Apply solvents with precision using a cotton swab or toothpick tip.
Frequently Asked Questions
Can I use a toothpick to remove a stuck eraser from a mechanical pencil?
Yes, a wooden toothpick can work for very soft erasers. Push the pointed end into the eraser and pull upward. However, toothpicks break easily under pressure and lack the strength of a metal pin or paperclip. They work best as a temporary solution when no other tools are available. If the eraser is hard or deeply stuck, switch to a metal tool for better results.
What size eraser refills fit most mechanical pencils?
Most standard mechanical pencils use eraser refills that measure about 3.5 to 5 millimeters in diameter. Pentel, Paper Mate, and Bic pencils commonly use similar sizes. The safest approach is to check the packaging of your specific pencil model or measure the old eraser before buying refills. Many eraser refill packs list compatible pencil models on the label.
Why does my eraser push down into the pencil instead of erasing?
This happens when the eraser has worn down too much and lost its support inside the holder. The pressure of erasing pushes the short stub deeper into the sleeve. The fix is to remove the worn eraser using any method in this guide and replace it with a fresh refill that sits properly above the holder rim.
Can I use a regular eraser piece as a replacement in my mechanical pencil?
You can cut a small cylinder from a standard block eraser to use as a temporary replacement. Trim it to match the diameter of the eraser holder and push it in. It may not fit as snugly as a factory refill, but it works in a pinch. For a long term solution, purchase the correct refill size for your pencil model.
Is it safe to use acetone on my mechanical pencil?
Acetone is effective at dissolving sticky residue but can damage certain plastics. Test a tiny amount on an inconspicuous area of the pencil first. If the plastic discolors, softens, or becomes tacky, stop immediately. Rubbing alcohol is a safer alternative for plastic bodied pencils. Acetone is generally safe on metal pencil bodies.
How often should I replace the eraser in my mechanical pencil?
Replace the eraser as soon as it wears down to the rim of the holder. For regular users, this might be every few weeks. For occasional users, check the eraser every couple of months. Replacing early prevents the eraser from sinking too deep and getting stuck, saving you time and frustration later.

Hi, I’m Zoe Ward, the creator and voice behind Fine Brush Vault. I’m passionate about art, painting, and exploring the world of colors. I spend my time testing and reviewing art supplies to help fellow creators find the best tools for their craft. Through honest reviews and detailed guides, my goal is to make your creative journey easier and more inspiring.