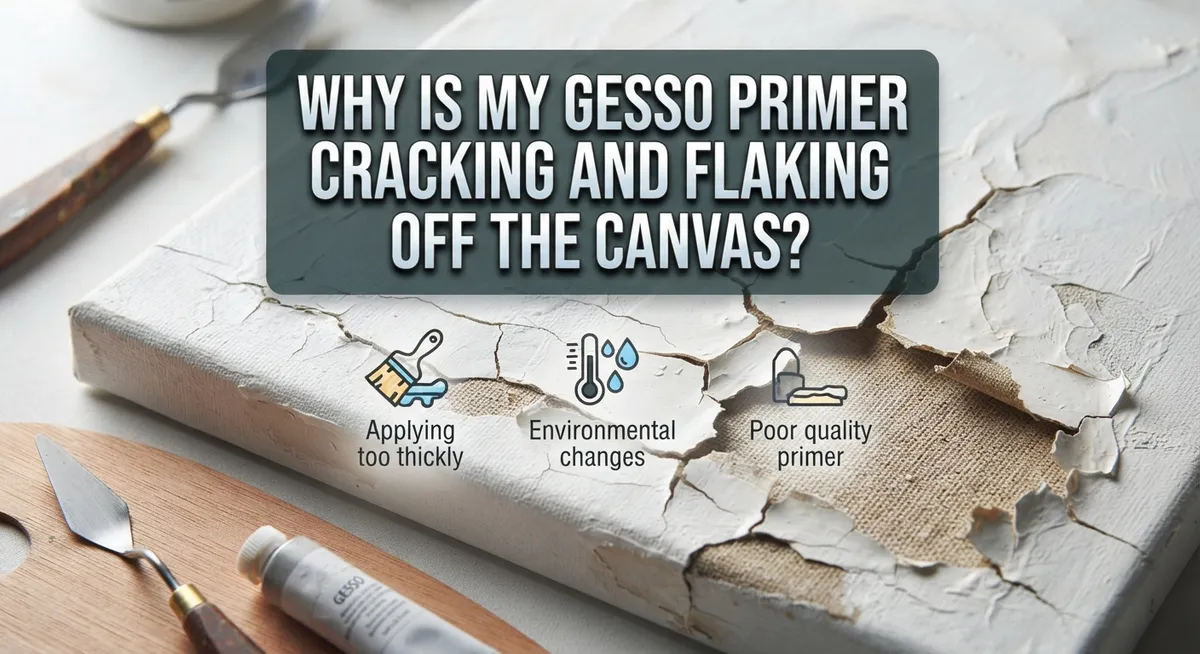
Why Is My Gesso Primer Cracking And Flaking Off The Canvas?
You just finished priming your canvas. It looked smooth and ready for paint. But now you see tiny cracks or flakes lifting off the surface.
This problem frustrates many artists. You spend time preparing your canvas, only to watch your gesso fail. The good news? This issue has clear causes and simple fixes.
Gesso cracking usually happens for a few common reasons. Maybe you applied it too thickly. Maybe air bubbles got trapped during application. Or perhaps your gesso didn’t get enough time to dry before you added another layer.
In a Nutshell
- Thick layers are the main problem. Thick gesso dries hard and stiff. It cannot bend with the canvas, so it cracks.
- Air bubbles cause weak spots. Bubbles trapped in the gesso create hollow areas. These spots break apart as the layer dries and moves.
- Rushing the drying time hurts your surface. Each coat needs full drying before you add another. Skipping this step traps moisture and weakens the whole layer.
- Mixing gesso types matters a lot. Acrylic gesso under oil paint soaks up oil from the paint. This causes the gesso to shrink and crack over time.
- Poor adhesion leads to flaking. If gesso does not bond well with the canvas, it will lift and peel away.
- Thin coats always beat thick ones. Multiple thin layers dry evenly and stay flexible. This simple habit prevents most cracking and flaking issues you might face.
What Causes Gesso to Crack or Flake in the First Place
Gesso cracks and flakes because of how it behaves as it dries and sits on your canvas. Understanding these causes helps you prevent the problem before it starts.
Thickness is the biggest culprit. When you apply gesso too thickly, it dries as a hard, rigid shell. Your canvas moves slightly when you handle it, stretch it, or even just store it. That movement causes the stiff gesso layer to crack. Thin layers stay flexible and move with the canvas instead of fighting against it.
Air bubbles create weak spots in your primer. When you stir or brush gesso, tiny bubbles get trapped inside. These hollow areas weaken the surface. As the gesso dries, those bubbles collapse or leave voids. Your paint layer then cracks right above these weak spots.
Drying time matters more than you think. If you apply a second coat before the first one fully dries, moisture gets trapped between layers. This causes uneven drying and shrinkage cracks. Each coat needs complete drying time so the gesso hardens uniformly.
Material mismatch creates real problems. Acrylic gesso absorbs oil from oil based paints. This absorption causes the paint layer to shrink while the gesso stays put. The tension between these two layers leads to cracking and flaking.
Poor adhesion between gesso and canvas means the primer never bonds properly to your surface. If the gesso does not stick well, it lifts away from the canvas. Paint on top of weak adhesion will flake off easily.
Sand between coats. Gesso surfaces become slick and shiny. The next coat slides around instead of gripping the surface. Fine grit sandpaper roughens the dried gesso so new layers stick better.
These causes work together. Fix them one at a time, and your gesso will stay put.
The Role of Application Thickness and Layering
Gesso thickness is the primary reason your primer cracks and flakes. When you apply gesso too heavily in one coat, it forms a rigid, inflexible shell that cannot move with your canvas. As the canvas naturally flexes during handling or temperature changes, the thick gesso layer breaks apart.
Multiple thin layers work far better than one thick application. Each thin coat dries evenly and maintains flexibility. The gesso bonds properly to the canvas when applied this way. You also avoid trapping air bubbles that weaken the surface.
Here is the practical approach: apply your first coat thinly and evenly across the entire canvas. Use a brush or roller and spread the gesso smoothly. Wait for complete drying before adding the second coat. This usually takes 1 to 2 hours depending on humidity and temperature.
Sand the dried layer lightly with fine-grit sandpaper. This creates a slightly textured surface that helps the next coat adhere better. Wipe away dust with a damp cloth. Apply your second thin coat the same way as the first.
Most artists need only 2 to 3 thin coats for proper coverage. The canvas should feel smooth and primed without any visible texture underneath. You should not see brush marks or uneven spots.
Never rush the drying process between layers. Applying gesso before the previous coat fully dries traps moisture inside. This moisture eventually escapes as the layers cure, causing cracks and separation.
Pay attention to air bubbles during application. Brush gently and avoid vigorous stirring before use. If you see bubbles on the surface, tap them gently with your brush to release them.
The key takeaway: thin, patient layering prevents almost all cracking problems. Your canvas stays flexible, the gesso adheres properly, and your painting surface lasts for years.
How Drying Time and Humidity Affect Gesso Stability
Drying time and humidity work together to determine whether your gesso stays stable or starts to crack. When you apply gesso, moisture needs to escape evenly from the entire layer. If the air around your canvas is too humid, water cannot leave the gesso fast enough.
Slow drying creates internal stress. When gesso dries unevenly, some parts harden while others remain soft underneath. This mismatch causes the surface to crack as the layer tries to shrink. The top hardens first and pulls away from the still-wet base layer.
High humidity directly slows the drying process. In damp conditions, your gesso may take twice as long to dry completely. You might think it feels dry to the touch after a few hours, but moisture remains trapped inside. If you apply a second coat during this window, you lock moisture between layers. This trapped water causes the gesso to blister and flake later.
Temperature also plays a role in drying stability. Cold environments slow evaporation significantly. Warm, dry spaces allow gesso to dry faster and more evenly. The ideal conditions are moderate temperature (around 65 to 75 degrees) with low to moderate humidity.
You should wait until your gesso feels completely hard before adding another coat. This usually takes 24 hours in normal conditions, but may require 48 hours in humid climates. Press your fingernail gently into the dried gesso. If it leaves no mark, the layer is ready for the next coat.
Check your workspace humidity if cracking persists. Use a dehumidifier in damp rooms. Open windows to increase air circulation when weather permits. These simple steps help moisture escape at a steady rate. Your gesso will dry uniformly and remain flexible enough to move with your canvas without cracking.
Step-by-Step: Applying Gesso the Right Way for Long-Lasting Results
Applying gesso correctly prevents most cracking and flaking problems before they start. The process is straightforward when you follow a few key principles.
Start with a clean canvas. Remove any dust or debris with a soft brush. A clean surface helps gesso bond properly to your canvas without weak spots underneath.
Apply your first coat thinly and evenly. Use a brush or roller to spread gesso across the entire surface. Thin coats dry uniformly and stay flexible as your canvas moves and shifts. Avoid the urge to load your brush with gesso. One thin pass works better than two heavy ones.
Wait for complete drying before adding the next coat. Gesso dries faster in warm, dry conditions. Most coats dry within a few hours, but patience matters more than speed. Rushing this step traps moisture inside, which causes cracks later.
Sand lightly between coats using fine-grit sandpaper. This creates texture that helps the next layer stick properly. Sand gently to smooth the surface without removing the layer completely. Wipe away dust with a damp cloth before applying your next coat.
Most artists need only 2 to 3 thin coats for proper coverage. This approach gives you a durable, flexible primer that won’t crack when your canvas flexes. Each thin layer dries evenly and maintains its integrity.
Pay attention to air bubbles while you apply gesso. Brush gently to release trapped air. Tapping your brush against the canvas edge helps bubbles escape before the gesso dries.
Check your workspace humidity if you live in a damp climate. High moisture slows drying and creates internal stress. Cool temperatures also extend drying time. Adjust your environment when possible, or simply allow extra time between coats.
This straightforward approach prevents the majority of gesso problems you’ll encounter.
Common Mistakes That Lead to Cracking and Flaking
When you apply gesso too thickly, you create a rigid layer that cannot flex with your canvas. Canvas naturally moves and shifts slightly. A thick gesso coat becomes brittle and cracks when the fabric underneath bends or stretches.
Excessive thickness also causes uneven drying. The outer surface hardens while the inner material stays soft and wet. This creates internal stress. As the bottom layers finally dry, they shrink at different rates than the surface. This uneven shrinkage pulls the coating apart.
Another common mistake involves skipping drying time between coats. When you apply a second coat before the first one fully hardens, moisture gets trapped inside. This trapped moisture creates pressure as it tries to escape. The result is bubbling, cracking, and eventual flaking off the canvas.
Air bubbles during application are often overlooked. When you brush or roll gesso onto canvas, you can accidentally whip air into the mixture. These bubbles weaken the dried layer. They create tiny hollow spots that collapse as the gesso hardens. Small cracks then spread outward from these weak points.
Using the wrong gesso type causes problems too. Acrylic gesso works well under acrylic paint. However, applying acrylic gesso under oil paint leads to serious cracking. Oil paint does not bond well to acrylic surfaces. The oil also pulls moisture from the acrylic layer, causing it to shrink and crack.
Poor surface preparation sets you up for failure. A dirty or greasy canvas prevents gesso from sticking properly. Loose fibers and dust create gaps between the primer and the fabric. These gaps allow the gesso to peel away.
The fix is simple: apply multiple thin coats instead of one thick one. Each thin layer dries evenly and stays flexible. This approach prevents most cracking and flaking problems before they start. Patience during the application process saves you frustration later.
Troubleshooting Existing Cracks and Flaking Before You Paint
When you discover cracks and flaking on your gesso primer, you need to act quickly. The damage tells you something went wrong during application or drying. Your first step is to stop painting and assess the situation.
Gently press on the cracked areas with your finger. If the gesso lifts away easily, poor adhesion caused the problem. The gesso didn’t bond properly to your canvas surface. If the gesso feels hard but shows spider web patterns of cracks, then thickness or flexibility issues are at fault.
Use a putty knife or scraper to remove any loose material. Work carefully so you don’t damage the canvas underneath. Flaking gesso will only get worse once paint goes on top. Removing it now prevents bigger problems later.
Sand the remaining gesso smooth with fine-grit sandpaper. This creates a better surface for new gesso layers. Work gently in circular motions to avoid creating dust clouds.
Clean away all dust with a damp cloth or sponge. Let the canvas dry completely before proceeding. Dust particles trap air and cause new adhesion problems.
Now you can reapply gesso, but change your approach this time. Apply thin, even coats instead of thick ones. Thick layers are the main culprit behind cracking and flaking. Wait for complete drying between each coat. This prevents internal stress that causes cracks.
Sand lightly between coats using the same fine-grit sandpaper. This helps each new layer stick better to the previous one.
If cracking happens again, check your workspace conditions. High humidity and cold temperatures slow drying and create stress. Poor air circulation traps moisture in the gesso layers. A fan or dehumidifier helps solve these issues.
Multiple thin coats always outperform one thick application. This approach gives you flexibility when your canvas naturally moves and shifts. Your gesso will stay intact through the entire painting process.
Tips for Ensuring Strong Adhesion and Flexibility
Strong adhesion keeps your gesso bonded to the canvas. Weak adhesion leads to flaking and peeling. The key is understanding what helps gesso stick properly.
Start with a clean canvas surface. Dust, dirt, and oils prevent gesso from gripping the fabric. Wipe your canvas with a dry cloth before you begin. If your canvas has any residue, use a slightly damp cloth and let it dry completely.
Apply gesso in thin, even layers. Thick applications create rigid coatings that cannot bend with your canvas. When the canvas flexes naturally, thick gesso cracks. Thin layers stay flexible and move with the material underneath.
Allow complete drying between coats. Rushing this step causes adhesion problems. Each layer needs time to cure fully before you add the next one. Check your gesso instructions for specific drying times. Most products need 24 hours or more in normal conditions.
Sand lightly between coats using fine-grit sandpaper. This step creates texture that helps the next layer grip better. You are not trying to remove material. You are just roughing up the smooth surface so adhesion improves.
Pay attention to air bubbles while you apply gesso. Bubbles weaken the bond between layers. Tap your brush gently on the canvas to release trapped air. Work slowly and deliberately across the surface.
Consider your workspace conditions. High humidity slows drying and creates weak adhesion. Low humidity can cause gesso to dry too fast and pull away from the canvas. Aim for moderate temperature and humidity levels.
Use the correct gesso type for your paint. Acrylic gesso works best under acrylic paint. Oil gesso works best under oil paint. Mixing types causes adhesion failure and shrinkage cracks.
Multiple thin coats always create better adhesion than one thick coat. This approach gives you a durable, flexible primer that stays bonded to your canvas through the entire painting process.
Final Thoughts
Cracking and flaking gesso feels frustrating, but the fix stays simple. Thin layers always beat thick ones. This single habit solves most problems you face.
Your canvas needs patience too. Rushing dry time sets you up for cracks later. Give each coat enough time before adding another layer.
Air bubbles seem small, but they cause big issues. Check your gesso as you apply it. Smooth out bubbles right away with your brush or roller.
Sanding matters more than most painters realize. A light pass with fine grit paper between coats creates a smooth, strong bond. This step takes minutes but saves you hours of frustration later.
Matching your gesso to your paint type also protects your work. Acrylic gesso pairs well with acrylic paint. Oil paint needs different preparation to avoid shrinkage and cracking.
Think of your canvas as a living surface. It flexes, breathes, and reacts to your environment. Flexible layers move with it instead of fighting against it.
When cracks do appear, don’t panic. You can scrape away loose gesso, sand the area smooth, and start fresh. This gives you a clean base for better results.
Good preparation now means less repair work later. Clean your canvas, apply thin coats, and let each layer dry fully. These small steps build a strong foundation for any painting.
Every artist faces this problem at some point. The difference lies in how you respond and adjust your technique.
Your next canvas can look flawless. Apply what you learned here, stay patient with drying times, and watch your gesso hold strong through every brushstroke that follows.
Frequently Asked Questions
Why does gesso crack even when I apply it carefully?
Gesso cracks for several reasons. Trapped air bubbles weaken the surface as it dries. When you apply gesso too thickly, the layer becomes rigid and inflexible. Your canvas naturally moves and bends slightly, so thick gesso cannot flex with it. The result is cracking.
Another common cause happens when acrylic gesso sits under oil paint. Oil paint causes acrylic gesso to shrink, which creates cracks across the surface. Using the wrong gesso type for your paint medium leads to this problem.
Can I fix cracking gesso without starting over?
Yes, you can repair it. First, remove all loose material with a scraper or putty knife. Sand the area smooth with fine grit sandpaper. Clean away the dust with a damp cloth.
Now reapply gesso using thin, even layers instead of one thick coat. Allow complete drying between each layer. This approach gives your primer flexibility and strength. Sand lightly between coats to help adhesion.
How many coats of gesso do I actually need?
Three to four thin coats work better than one or two thick ones. Each thin layer bonds properly to the surface below. Thick single coats dry unevenly and crack easily.
Allow each coat to dry completely before sanding and applying the next one. Multiple thin layers create a flexible, durable surface that moves with your canvas.
What workspace conditions affect gesso cracking?
Temperature and humidity matter more than most artists realize. Extreme heat causes gesso to dry too quickly and crack. High humidity slows drying, which can trap moisture inside the layer.
Keep your workspace at moderate temperature and humidity levels. Avoid direct sunlight or heat sources while gesso dries.

Hi, I’m Zoe Ward, the creator and voice behind Fine Brush Vault. I’m passionate about art, painting, and exploring the world of colors. I spend my time testing and reviewing art supplies to help fellow creators find the best tools for their craft. Through honest reviews and detailed guides, my goal is to make your creative journey easier and more inspiring.